中級編
目的
・Presentationを用いて、必要最低限の刺激提示プログラムが組めるようになること。
・以下のファイルを使用できるようになること。
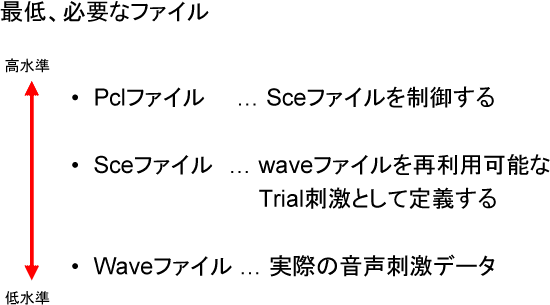
(1) Pcl ファイル
(2) Tem ファイル
(3) Sdf ファイル
(1) Pcl ファイル
早速、何か作ってみよう ...
<作るもの>
・ オッドボールタスク
オッドボールタスク(odd-ball task)とは?
・通常、高音と低音の聴覚刺激を用いる。
・頻度が多い刺激(Standard)と少ない刺激(Deviant)を比較する事で、P300と呼ばれる事象関連電位(ERP)を容易に観測することができる。
・刺激の提示割合は、Standard:Deviant=8:2が、最もERP反応を出しやすいとされている。今回は、7:3で行う。
難しいことは、抜きにして、とりあえずプログラムを作ってみよう !
 Sce ソース ( odd_ball_task.sce )
# File Setting
scenario = "odd_ball_task.sce";
pcl_file= "odd_ball_task.pcl";
# Default Setting
default_font_size = 100;
default_text_color= 100,100,100;
default_background_color= 140,140,140;
default_trial_duration= stimuli_length;
active_buttons= 2;
button_codes= 1, 2;
write_codes= true;
pulse_width= 20;
# ----------------------------------------
begin;
picture{}default;
# 低音刺激
trial{
sound{
wavefile{ filename = "1khz_100ms.wav"; };
};
picture{
#null
text{ caption = " ";
font_size= 30;
};
x = 0; y = 0;
};
time = 0;
port_code= 3;
duration = 1000;
}alarm_1000hz; 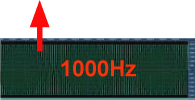
# 高音刺激
trial{
sound
{wavefile{ filename = "3khz_100ms.wav"; };
};
picture{
#null
text{ caption = " ";
font_size= 30;
};
x = 0; y = 0;
};
time = 0;
port_code= 4;
duration = 1000;
}alarm_3000hz;
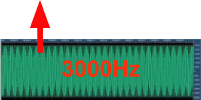
コメント 低音刺激(1000Hz)と高音刺激(3000Hz)のトライアル刺激を定義する。定義したトライアル刺激は、Pclファイルから読み込んで実行できる。
 Pcl ソース ( odd_ball_task.pcl )
loop
int set = 1;
until set > 300
begin
#刺激を Standard:Deviant = 7:3 で提示する.
if ( 1.0 * random() < 0.7 ) then
alarm_1000hz.present();
else
alarm_3000hz.present();
end;
# 以下を隠せば、無限ループ
#set = set + 1;
end;
コメント 提示する刺激の頻度は 1000Hz:3000Hz = 7:3 とする。Pclファイル内でトライアル刺激を提示するには、以下のようにする。
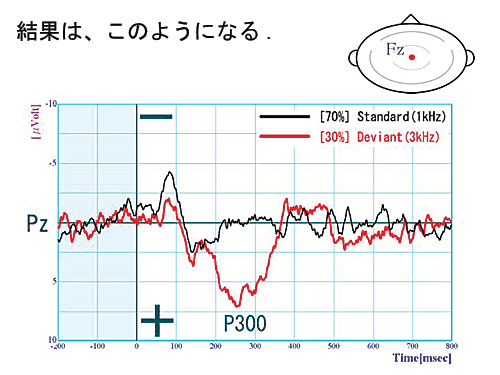
コメント 高頻度刺激(1000Hz)を黒線、低頻度刺激(3000Hz)を赤線で示す。低頻度の方が、200msから350msの潜時で大きく陽性に傾いているのが観察できる。
(2) Tem ファイル
次に、もう一つ具体例を見てみよう。
<作るもの>
・ ストループ効果を検証する実験
ストループ効果(Stroop Effect)とは?
・文字の意味とその色が異なるときに、反応時間が遅れる現象を指す。

(2) 差異条件

コメント 同一条件に比べて差異条件の文字は読みにくい。被験者に行わせる課題は、文字の意味と色が一致しているかどうかを○×で判断してもらうというものである。
難しいことは、抜きにして、とりあえずプログラムを作ってみよう !
用意するファイルは5つある。
Sce ファイル
(1) stroop.sce
Tem ファイル
(2) trial_color.tem (雛形)
(3) explanation.tem (雛形)
(4) main.tem (トライアルの定義)
Pcl ファイル
(5) stroop.pcl
ソースの重要箇所は、赤文字で表示してある。
(1) Sce ソース ( stroop.sce
)
# File Setting
scenario = "stroop.sce";
pcl_file = "stroop.pcl";
# Default Setting
default_font_size = 100;
default_text_color = 0,0,0;
default_background_color = 255,255,255;
default_trial_duration = stimuli_length;
active_buttons = 3;
button_codes = 1,2,3; # 1=next, 2=corr, 3=incorr
write_codes = true;
pulse_width = 20;
no_logfile = false;
# ----------------------------------------
begin;
picture{}default;
# 刺激文
TEMPLATE "main.tem";
コメント 重要なのは、後述する main.tem ファイルを読み込んでいる点である。読み込むには、以下のようにする。
main.tem ファイルには、実験で使用するトライアル刺激が全て定義されている。 では、このSceファイルの目的は、何か?結局、「初期設定」と「Temファイルの読み込み」だけである。 しかし、このように限定すれば、トライアル刺激をTemファイルだけで一元管理できる利点がある。
 (2) Tem ソース ( trial_color.tem
)
(2) Tem ソース ( trial_color.tem
)
trial{
trial_duration = forever;
trial_type = first_response;
picture{
# 色文字 --> 赤、青、黄、緑
text{
caption = $txt;
font_size = $fsize;
font_color = $fcol;
};
x = 0; y = 0;
# fixed point -------- #
box{
color = 0,0,0;
height = 2;
width = 50;
};
x=0;y=0;
box{
color = 0,0,0;
height = 50;
width = 2;
};
x=0;y=0;
# --------------------- #
};
time = 0;
target_button = $res;
code=$id;
};
コメント このTemファイルは、同じ雛形のトライアル刺激を量産するために使用する。重要な点は、赤で示した変数名を定義しておくことである。定義した部分だけが、後にトライアル刺激を作成する際に、変更を加えられる。また、変数名の前には、$を忘れないように注意してほしい。
さらに、codeは、必ず定義しておくこと(ここでは、$idという変数)。理由は、後にSdfファイルで、トライアル刺激を区別するには、codeに記述されてある情報だけが頼りになるからである。
このTemファイルは、トライアル刺激を作成するための雛形である。機能は、色のついた文字を提示し、被験者からのボタン押しのレスポンスを待つことである。
(3) Tem ソース ( explanation.tem
)
# 説明文
trial{
trial_duration = forever;
trial_type = correct_response;
picture{
# Explanation
text{ caption = $txe;
font_size = 30;
font_color= 0,0,0;
text_align= align_left;
};
x = 0; y = 0;
};
code = $cod;
target_button = 1;
};
コメント このTemファイルは、トライアル刺激を作成するための雛形である。機能は、被験者に説明文を提示することである。
(4) Tem ソース ( main.tem
)
# ==================================
# Default Property Setting
# ==================================
$po = 1;
$fs = 200; $du = 1000;
$subject = "樋口正法";
$fo1 = "赤";
$fo2 = "青";
$fo3 = "緑";
$fo4 = "黄";
$co1 = "255,0,0"; # 赤
$co2 = "0,0,255"; # 青
$co3 = "0,255,0"; # 緑
$co4 = "255,255,0"; # 黄
$cob = "0,0,0"; # 黒
$cow = "255,255,255"; # 白
$res0 = 3; # × (右クリック)
$res1 = 2; # ○ (左クリック)
# ==================================
# 文字と色が同じ条件 (Identity)
# ==================================
$cid01 = "aka_red_1";
$cid02 = "ao_blue_1";
$cid03 = "midori_green_1";
$cid04 = "ki_yellow_1";
# 同じ刺激を3セット分含む
array{
TEMPLATE "trial_color.tem" randomize{
txt fsize fcol res id;
$fo1 $fs $co1 $res1 $cid01; # 1set
$fo2 $fs $co2 $res1 $cid02;
$fo3 $fs $co3 $res1 $cid03;
$fo4 $fs $co4 $res1 $cid04;
$fo1 $fs $co1 $res1 $cid01; # 2set
$fo2 $fs $co2 $res1 $cid02;
$fo3 $fs $co3 $res1 $cid03;
$fo4 $fs $co4 $res1 $cid04;
$fo1 $fs $co1 $res1 $cid01; # 3set
$fo2 $fs $co2 $res1 $cid02;
$fo3 $fs $co3 $res1 $cid03;
$fo4 $fs $co4 $res1 $cid04;
};
}identity_set;
# ==================================
# 文字と色が違う条件 (Difference)
# ==================================
$tid01 = "aka_blue_0";
$tid02 = "aka_green_0";
$tid03 = "aka_yellow_0";
$tid04 = "ao_red_0";
$tid05 = "ao_green_0";
$tid06 = "ao_yellow_0";
$tid07 = "midori_red_0";
$tid08 = "midori_blue_0";
$tid09 = "midori_yellow_0";
$tid10 = "ki_red_0";
$tid11 = "ki_blue_0";
$tid12 = "ki_green_0";
array{
TEMPLATE "trial_color.tem" randomize{
txt fsize fcol res id;
$fo1 $fs $co2 $res0 $tid01;
$fo1 $fs $co3 $res0 $tid02;
$fo1 $fs $co4 $res0 $tid03;
$fo2 $fs $co1 $res0 $tid04;
$fo2 $fs $co3 $res0 $tid05;
$fo2 $fs $co4 $res0 $tid06;
$fo3 $fs $co1 $res0 $tid07;
$fo3 $fs $co2 $res0 $tid08;
$fo3 $fs $co4 $res0 $tid09;
$fo4 $fs $co1 $res0 $tid10;
$fo4 $fs $co2 $res0 $tid11;
$fo4 $fs $co3 $res0 $tid12;
};
}difference_set;
# ==================================
# 説明文
# ==================================
$ex1 =
" これから、$subjectさんに色文字について
判断してもらいます。\n
赤、青、緑、黄の4色の漢字のいずれか、1文字が
中心に現れます。漢字の色が、実際の文字の色と同じか
どうかをボタンを押して判断して下さい。\n
同じ場合は○(左ボタン)を押し、違う場合は、×\(右ボタン)
を押してください。\n
答えがわかったら、できるだけ素早く正確にボタンを
押すことを心がけて下さい。\n
では、実験を開始します。";
$ex2 =
" 以上で、実験は終了です。\n
$subjectさん、お疲れ様でした。";
$ex3 =
" ここに説明文を書く。";
$ex4 =
" ここに説明文を書く。";
$ex5 =
" ここに説明文を書く。";
$logcode = "ログ";
$participant = "実験参加者:\t$subject";
array{
TEMPLATE "explanation.tem" {
txe cod;
"$ex1" $logcode;
"$ex2" $participant;
"$ex3" $logcode;
"$ex4" $logcode;
"$ex5" $logcode;
};
}exp_stim;
# ==================================
# 刺激間刺激
# ==================================
# 刺激前
trial{
picture{
text{ caption = "#####";
font_size = 160;
};
x = 0; y = 0;
# fixed point -------- #
box{
color = 0,0,0;
height = 2;
width = 50;
};
x=0;y=0;
box{
color = 0,0,0;
height = 50;
width = 2;
};
x=0;y=0;
# --------------------- #
};
time = 0;
duration = 1000;
}pre_stim;
# 刺激後
trial{
picture{
# fixed point -------- #
box{
color = 0,0,0;
height = 2;
width = 50;
};
x=0;y=0;
box{
color = 0,0,0;
height = 50;
width = 2;
};
x=0;y=0;
# --------------------- #
};
time = 0;
duration = 1000;
}post_stim;
# 目覚まし音
trial{
sound{
wavefile{ filename = "1khz_100ms.wav"; };
};
picture{
# fixed point -------- #
box{
color = 0,0,0;
height = 2;
width = 50;
};
x=0;y=0;
box{
color = 0,0,0;
height = 50;
width = 2;
};
x=0;y=0;
# --------------------- #
};
time = 0;
duration = 1000;
}alarm;
コメント main.tem は、trial_color.tem と explanation.tem のように、雛形を作成するのが目的ではない。このTemファイルは、実験で使用する全てのトライアル刺激を定義するのが目的である。
多少コードが長くて見にくくなっても、仕方がない。文字と色が
同じ条件(Identity) と 違う条件(Difference)のトライアル刺激 は、配列を用いて定義している。配列を定義するには、以下のようにする。
array{
TEMPLATE "[読み込むファイル].tem" randomize{
[変数1] [変数2] [変数3] [変数4] ...;
[値1] [値2] [値3] [値4] ...;
.
.
.
};
}[配列トライアル刺激名];
[変数n]には、読み込むTemファイル内で定義されている変数の数だけ指定する。このとき、$はいらない。[値n]には、直接、[変数n]に代入する値を指定してもよいが、この
main.tem 内では、$を用いて定義した変数を代わりに用いている。なお、randomize オプションを指定すると、配列内のトライアル刺激の順番が、ランダム化される。これは、必須なものではないので、いらなければ外すこと。
(5) Pcl ソース ( stroop.pcl
)
# ********************************
# randomized blocks
# ********************************
# 1 -> Identity
# 0 -> Difference
array
twodozen_bit.shuffle();
# ********************************
# Main
# ********************************
# 変数
int block = 13; # 繰り返しブロック数
int all = 24 * block; # 全トライアル数
int cc = 1;
int tt = 1;
#------------------------------------
# ここから
#------------------------------------
# 実験開始前の説明
exp_stim[1].present();
loop
int n_trial = 1;
until n_trial > all
begin
pre_stim.present();
int i = n_trial % 24;
if(twodozen_bit[i+1] == 1) then
# Identity
identity_set[cc].present();
cc = cc + 1;
if(cc > 12) then
cc = 1;
identity_set.shuffle();
end;
else
# Difference
difference_set[tt].present();
tt = tt + 1;
if(tt > 12) then
tt = 1;
difference_set.shuffle();
end;
end;
post_stim.present();
if(n_trial%24 == 0) then
alarm.present();
twodozen_bit.shuffle();
end;
n_trial = n_trial + 1;
end;
# 実験終了後のコメント
exp_stim[2].present();
#------------------------------------
# ここまで
#------------------------------------
コメント 重要なのは、定義した配列を読み込んで提示し、 全てのトライアル刺激が提示された後で、配列の順番を再びランダム化している点である。 ランダム化するには、以下のようにする。
なお、twodozen_bit[24]という配列は、乱数を定義している。1が出たら同一条件のトライアル刺激を、0が出たら差異条件のトライアル刺激を選択する。
(3) Sdf ファイル
結果を出力しよう。
デフォルトのSdfファイルの記述は、以下のようになっている。
# This is the default set definition file
# To specify your own, see the "Logfiles" tab
picture: event_type == "Picture"
sound: event_type == "Sound"
video: event_type == "Video"
nothing: event_type == "Nothing"
stimulus: picture or sound or video or nothing
stimulus_count = count( stimulus )
response: event_type == "Response"
response_count = count( response )
pulses: event_type == "Pulse"
port_input: event_type == "Port Input"
text_input: event_type == "Text Input"
save_logfile: event_type == "Save Logfile"
control: event_type == "Pause" or event_type == "Resume" or event_type == "Quit"
unc_over_1 : time_uncertainty > 1
over1_count = count( unc_over_1 )
unc_over_5 : time_uncertainty > 5
over5_count = count( unc_over_5 )
コメント Sdfファイルは、データの集合(Sets)を定義することが、基本的なプログラミング作業である。集合を定義するには、:(コロン)を用いて行う。集合の条件には、and や or や not などの論理記号を用いることができ、既に定義されている集合を拡張して定義することもできる。
デフォルトのSdfファイルだけでは、得られた実験データを集計できない。 このままでは、不十分なので、新しいSdfファイルを次に定義する。
Sdf ソース ( stroop.sdf )
# -----------------------------------------------------------
#
# RT(Reaction Time) と 正答率(Correction Rate) を
# 測定する Logfiles
スクリプト
#
# -----------------------------------------------------------
# ==================================
# 集合の定義
# ==================================
#### 漢字とその文字の色が、同じか違うか ####
# (1) 同一条件
cond_identity : code contains "1"
# (2) 差異条件
cond_difference : code contains "0"
# ==================================
# RTの集合の定義
# ==================================
# (1) 同一条件
RT_cond_identity : response and [rel_index
== index - 1] is cond_identity
# (2) 差異条件
RT_cond_difference : response and [rel_index
== index - 1] is cond_difference
# ==================================
# CTの集合の定義
# ==================================
# 正答 -> corr
# 誤答 -> inco
# (1) 同一条件
CR_corr_cond_identity : RT_cond_identity
and code=="2"
CR_inco_cond_identity : RT_cond_identity
and code=="3"
# (2) 差異条件
CR_corr_cond_difference : RT_cond_difference
and code=="3"
CR_inco_cond_difference : RT_cond_difference
and code=="2"
# ***************************************************
# RTの統計処理
# ***************************************************
# 条件の数
num_rt_cond_identity = count( RT_cond_identity
)
num_rt_cond_difference = count( RT_cond_difference)
# 平均値
ave_rt_cond_identity = avg( RT_cond_identity,
trial_time )
ave_rt_cond_difference = avg( RT_cond_difference,
trial_time )
# 標準偏差
std_rt_cond_identity = std_dev( RT_cond_identity,
trial_time )
std_rt_cond_difference = std_dev( RT_cond_difference,
trial_time )
# 最大値
max_rt_cond_identity = max( RT_cond_identity,
trial_time )
max_rt_cond_difference = max( RT_cond_difference,
trial_time )
# 最小値
min_rt_cond_identity = min( RT_cond_identity,
trial_time )
min_rt_cond_difference = min( RT_cond_difference,
trial_time )
# ***************************************************
# CTの統計処理
# ***************************************************
# (1) 同一条件
num_cr_corr_cond_identity = count( CR_corr_cond_identity
)
num_cr_inco_cond_identity = count( CR_inco_cond_identity
)
rate_cond_identity = 100 * num_cr_corr_cond_identity
/ num_rt_cond_identity
# (2) 差異条件
num_cr_corr_cond_difference = count( CR_corr_cond_difference)
num_cr_inco_cond_difference = count( CR_inco_cond_difference)
rate_cond_difference = 100 * num_cr_corr_cond_difference
/ num_rt_cond_difference
# イベントテーブルの定義
event_table stroop_RT_CR_table(trial, code, trial_time)
############### Print定義 ###############
print "--------------- 出力結果 ---------------"
# ----------- #
# 全体 #
# ----------- #
print "\n\n"
print "□□□□□□□□□□□□□□□□□□□□□□□□□□□"
print "全体: (1) 同一条件"
print "====================================== "
print "RT;"
print "-------------------------------------- "
print stroop_RT_CR_table( RT_cond_identity,"\t", "\n")
print "(単位:ms)"
print "平均値\t標準偏差\t最大値\t最小値"
print ave_rt_cond_identity,"\t",std_rt_cond_identity,"\t",
max_rt_cond_identity,"\t",min_rt_cond_identity
print "\n====================================== "
print "CR;"
print "-------------------------------------- "
print "全体数\t正答数\t誤答数\t正答率(%) "
print num_rt_cond_identity,"\t",num_cr_corr_cond_identity,"\t",
num_cr_inco_cond_identity,"\t",rate_cond_identity
print "\n\n"
print "□□□□□□□□□□□□□□□□□□□□□□□□□□□"
print "全体: (2) 差異条件"
print "====================================== "
print "RT;"
print "-------------------------------------- "
print stroop_RT_CR_table( RT_cond_difference,"\t", "\n")
print "(単位:ms)"
print "平均値\t標準偏差\t最大値\t最小値"
print ave_rt_cond_difference,"\t",std_rt_cond_difference,"\t",
max_rt_cond_difference,"\t",min_rt_cond_difference
print "\n====================================== "
print "CR;"
print "-------------------------------------- "
print "全体数\t正答数\t誤答数\t正答率(%) "
print num_rt_cond_difference,"\t",num_cr_corr_cond_difference,"\t",
num_cr_inco_cond_difference,"\t",rate_cond_difference
コメント 実験上、集合の条件は、予め記述しておいたcodeの文字列によって設定するのが基本である。条件を記述する際には、==や !=、contains の記号を利用できる。ここでは、 code内に含まれている文字列に、0か1が含まれているかどうかを判定して、トライアル刺激の振り分けを行っている。 contains は、[String1]に少なくとも[String2]の文字列が含まれていれば、条件に合致する。
目的の集合が、すぐに得られない場合には、関連のある集合(Relative Sets)を用いて、定義することができる。 具体的には、目的の集合のトライアル番号(index)と関連のある集合のトライアル番号(rel_index)の関係を 以下のように記述すれば、目的の集合が決定される。関係式では、-と+によって、順番に違いが出るので注意すること。しかし、rel_indexを用いた方法は、最も単純なものである。Relative Setsを用いた条件式は、rel_timeなど他にもあるので、マニュアルを読んで各自研究してほしい。ちなみに、 [ と ] の括弧は、必須である。
イベントテーブルを独自に定義すれば、必要なイベントプロパティのみをAnalyzerに表示させることができる。 イベントテーブルは、以下のようにすれば定義できる。 イベントプロパティには、index や event_type、code、trial_time などがあるが、詳細はヘルプを参照してほしい。
統計処理は、定義済みの集合に対してだけ行うことができる。条件の数、平均値、標準偏差、最大値、最小値を求める関数が、組み込み関数で用意されている。実際の処理は、変数名を定義すれば自動で求められる。具体的には、以下のようにする。
条件の数 : [変数名] ==
count( [処理対象の集合名] )
平均値 : [変数名] ==
avg( [処理対象の集合名], [プロパティ])
標準偏差: [変数名] ==
std_dev( [処理対象の集合名], [プロパティ] )
最大値 : [変数名] ==
max( [処理対象の集合名], [プロパティ] )
最小値 : [変数名] ==
min( [処理対象の集合名], [プロパティ] )
最終的には、定義したイベントテーブルや変数を用いて結果を出力させる。 集合のままでは、結果を出力できないので注意すること。出力したデータは、表計算ソフトなどでさらに処理を加えることも可能である。
Sdfファイルで処理した実験データをExelに読み込み、グラフを表示させてみた。

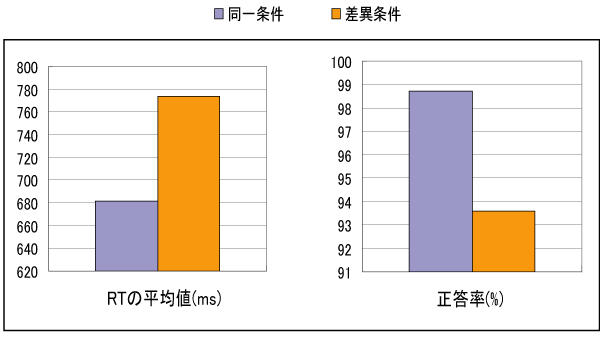
コメント 被験者1名の実験結果を示したもの。 同一条件に比べて、差異条件の方が反応時間が遅く、かつ正答率が低いという結果を示している。 このように簡単に、一般的なストループ効果を確認することができる。